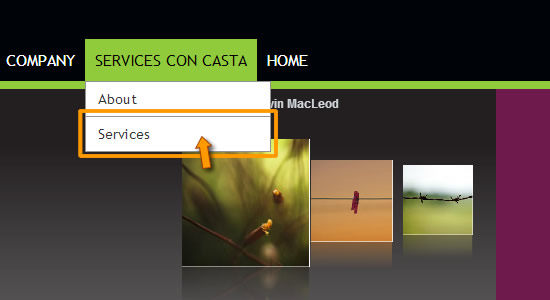
Drop-down Menus are now available on the Easy WebContent Site Builder. Simple, easy yet powerful with full control of style and formatting for a professional looking Drop Down menu you can add to any tab on your website.
The average website starts with little as five to six pages. But as your business or personal content needs grow so will your website. Your company grows, you have new products and new services or you just need to consolidate content into shorter more targeted pages and you are faced with the challenge of squeezing more pages on your horizontal navigation bar.
And that is where using dropdown menus come into play.
To improve usability on your website and rather than overwhelming your user with too many links in one visible menu, drop-down menus are a great solution to keeping a clean and intuitive navigation on your web site.
We decided to integrate a fully customizeable drop-down menu system that gives website owners full control of their navigation structure. In simple drag and drop fashion without any design or programming experience you can now create a navigation drop-down menu. In laymen terms you can move pages under other pages to assign the dropdown structure, control the order of each menu and control the exact design of your menu so it fits the style and theme of your site.
You could potentially have 10’s or more pages within your site without overwhelming your user and avoiding rows of links that can look unprofessional. There is a 7 second rule that is popular in web usability standards. A user will decide within (or often less) than 7 seconds where they want to go. So if you have too many choices and links at top of your web page a user can get confused with the choices and abandon their search, at least on your site. However having primary links on your navigation and consolidating secondary links under the navigation will help to keep your menu system clean and easy to understand while allowing the user to access all pages of your site from one location.
Let’s say you offer Landscaping Services and want to have a brief page about each of the different services you offer. You can have a Services Tab and under it attach a dropdown menu so when user rolls over the Services tab they can see the list of services offered with each going to designated page of your choice.
Here’s a closer look at how the Menu system works and tips on using the feature.
Step 1: Create your pages
First you need to create the pages you want to have on your navigation. Let’s say you want to have three pages under your Services menu. You would want to have a Services page created and three additional pages each for one of your services.

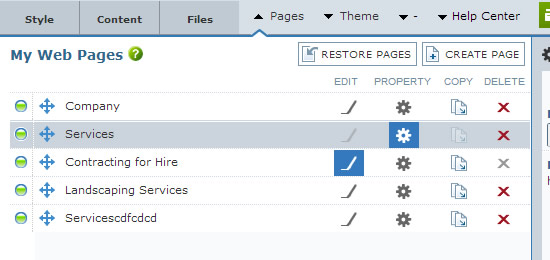
Once you created your page it will appear in your Page listing.
Step 2: Assign page hierarchy
Don’t be afraid of the word “hierarchy” . It simply means you can assign which pages will be in a dropdown with respect to your main pages.
How do you assign a page to a drop-down menu?
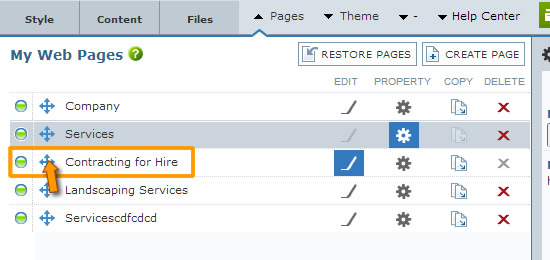
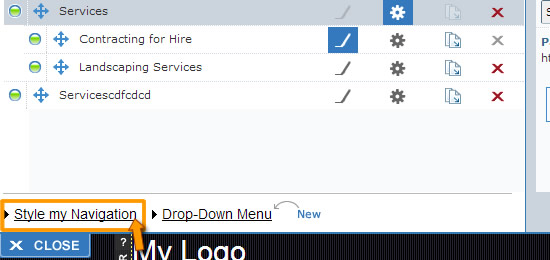
By default all pages will appear in the primary level (in your main navigation as shown below). But with the new Dropdown feature, you can drag a link and drop it slightly under and to right of the button you want it to show under.
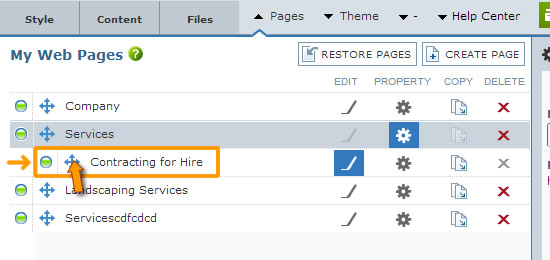
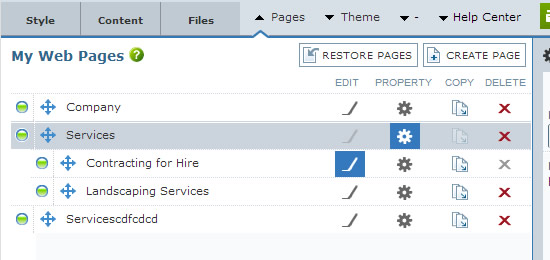
So in case of example below user is dragging “Contracting for Hire” under the “Services” link and you can see when you drag and item slightly to the right of the Services it will form under that tab as a sub category (this forms your dropdown once you drop it there).
You can repeat this step as needed to form your drop-down menu. (you can also drag a page out of the drop-down menu by following the opposite of this step: by dragging page under and to very left side of the page list which will detach itself from the dropdown menu.
Note: You can come back anytime and modify your menu, change the order, add new pages and even stylize your menu.
Step 3: Style your Menu
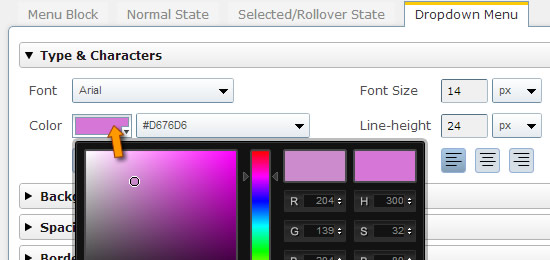
You can fully style your menu. By default it will get a clean simple color choices inherited from your site’s current color scheme. You can of course modify the design of your drop-down to fit your exact needs.
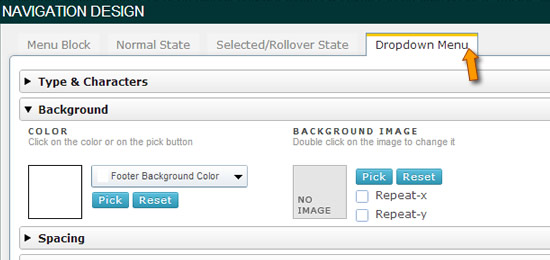
You can do this by going to your Pages section on top of the Site Builder menu bar and click on “Style my Navigation” at the bottom of your page list. This will launch the Navigation design widget. You can then select from different tabs to style your navigation. To style your drop-down menu, click on the “Dropdown Menu” tab.
Tip: keep things clean and simple. Avoid using bright colors and always maintain good contrast of your text over the background color. For example avoid having yellow text over a white background. That is not enough contrast for your users.
Closing thoughts:
At Easy WebContent we love user feedback. The function and format of the drop-down menu is the result of direct feedback from our active users who pointed out their needs. We listen to your needs and whenever we find trends of user behavior we formulate that into new functionality and features that will in turn serve you our users well. It’s all about giving our user best the best ability to design, manage and maintain their online presence. No other Site Builder combines the ease of use the degree of flexibility and features the Easy WebContent Site Builder provides.
Not a Site Builder user? Perhaps it’s time you create a professional web presence for your business. Sign-up here for a free trial and take charge of your own web presence. Build your professional website today.


