


We have been receiving requests (or should we say complaints) over the last few months from multiple users who wanted the ability to create transitions that occur automatically between presentation slides.
You see up to this point you could create multiple slides (or as some call it slide decks) using Visme (formerly EWC Presenter) but could only allow viewers to manually click on the control icons or right/left arrow keys to transition between slides.

But some of you just wanted to automate this process; ”Why should I not be able to assign an automatic transition to my slides if I want to?” asked one user, and another complained “Why in the world do I have to do all my animation in one single slide if I want to have it automatically transition from one scene to another? It’s kind of frustrating..”
Today we’re glad to announce that you now have further control over your presentation and animation transitions! It’s so elementary but as user feedback proved, it was absolutely necessary to many.
So with that said, not only are we giving you the ability to do automatic transitions, but we’re also allowing you to set the delay between your slides and the transition type. Perhaps you want to allow 5 seconds after each slide is loaded to move user to the next slide, or perhaps you want to do it much longer. It’s really up to you; you set the tone that you feel works best for your slides and your viewers.
This short video gives you a quick insight to slide transitions:
Here’s how it works:
1. On the right panel click on the “Slides” tab assuming it is not already open and then click the “+ Slide” button at top of the slide panel.
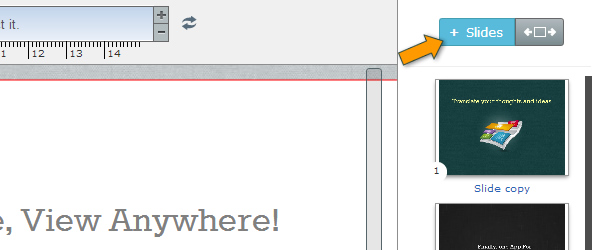
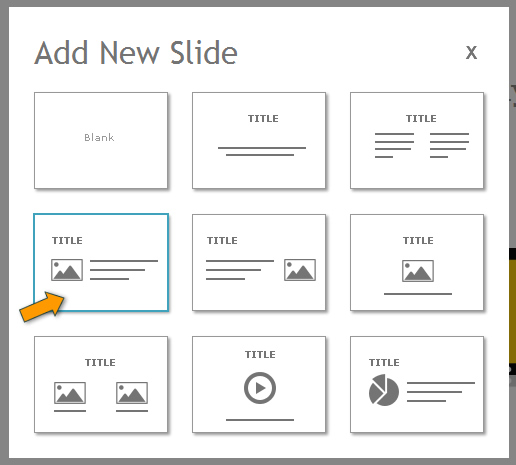
2. Choose the slide template you want. (Naturally you need to have more than one slide to manage transitions.
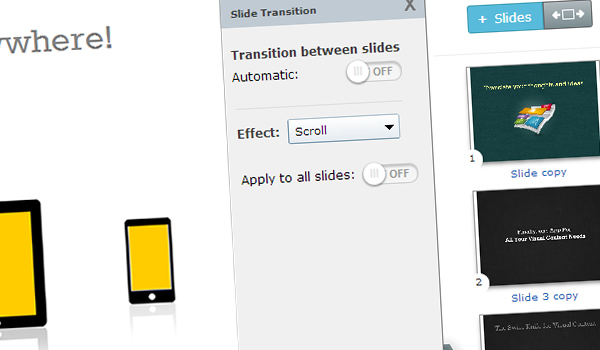
3. Click on the transition tab (this is dark gray tab at top of slides panel)
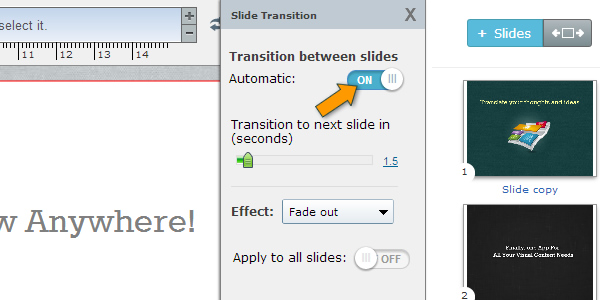
By default transitions are not automatic. To enable it select the “yes” for automatic transition”.
You can also customize your transition from default settings including the transition effect and the delay.
Transition effect:
There are currently only a few transition effects. They’re quire smooth and neat. No worries as we will be rolling out more transitions in the near future.

Delay:
Depending on what you want to achieve, select the amount of delay you want to set between slides. For example if you want a seamless transition from one slide to another without delay, set your value to zero seconds.
Note: A zero delay is really meant for animated slides that are more than a few seconds long where each slide is treated as a scene so when animation reaches the end of a slide it immediately transitions to the next slide. It’s not meant for slides with no use of the animation timeline.
here’s an example of a project with the automatic transition:

What can you use auto-transitions for?
The use of auto-transition’s applications go beyond Presentations. For example rather than creating a long animation in one single slide, if you want to have a longer animation and break it into separate scenes, you can assign one slide for each scene as described in the note above (zero seconds transitions).
Let’s say you have an animation around 60 seconds with three scenes: A beginning, a middle and an end. Rather than doing the entire 60 seconds of animation in one scene you can break it down to 3 slides (one for each scene) each composed of approximately 20 seconds or whatever length you wish to have it for and apply an automated transition with no delay so it can smoothly transition from one scene to another.
This is often recommended to more easily manage long presentations; it allows you to more easily locate and break them into chapters and add new chapters easily between those scenes should you ever need to.
Other uses of the auto-transitions are for Presentations and Carousels where you present a slide’s content to the user for a certain amount of time and then after some seconds transition to the next piece.
You can put auto-transitions to good use in:
Presentations: Create presentations and slide decks with multiple slides that transition
automatically from one slide to another such as business presentation.

Carousels: Put multiple images combined with short text/messages and allow them to rotate every 5-10 seconds. A great visual for use on website home pages.

Long Animations: Rather than having one long tail animation, break it down to separate scenes or chapters and allow viewer to be moved seamlessly from one scene to another.
 Payman Taei is the Founder of HindSite Interactive, an award winning web design and